
Beginner’s Guide to Drone Photography
Drone photography opens up incredible creative opportunities, allowing you to capture stunning aerial shots that would be impossible with a traditional camera. However, mastering drone photography requires more than just launching your unmanned aerial vehicle (UAV) into the sky. If you’re entering the world of aerial photography, here are some essential tips to get you started and improve your shots.
1. Consider the Positioning of Your Drone with the Sun and Your Subject
The position of the sun in relation to your subject can significantly impact your shot. If the sun is directly behind your subject, it may create silhouettes, while having the sun behind your drone can result in more evenly lit subjects. Experiment with different angles to achieve the best lighting conditions and avoid harsh shadows or lens flares.
What is lens flare? Lens flare occurs when bright light, such as the sun, enters the camera lens at an angle, creating unwanted streaks or bright spots in your photo. This can reduce image clarity and contrast. Positioning your drone carefully can help avoid this issue.
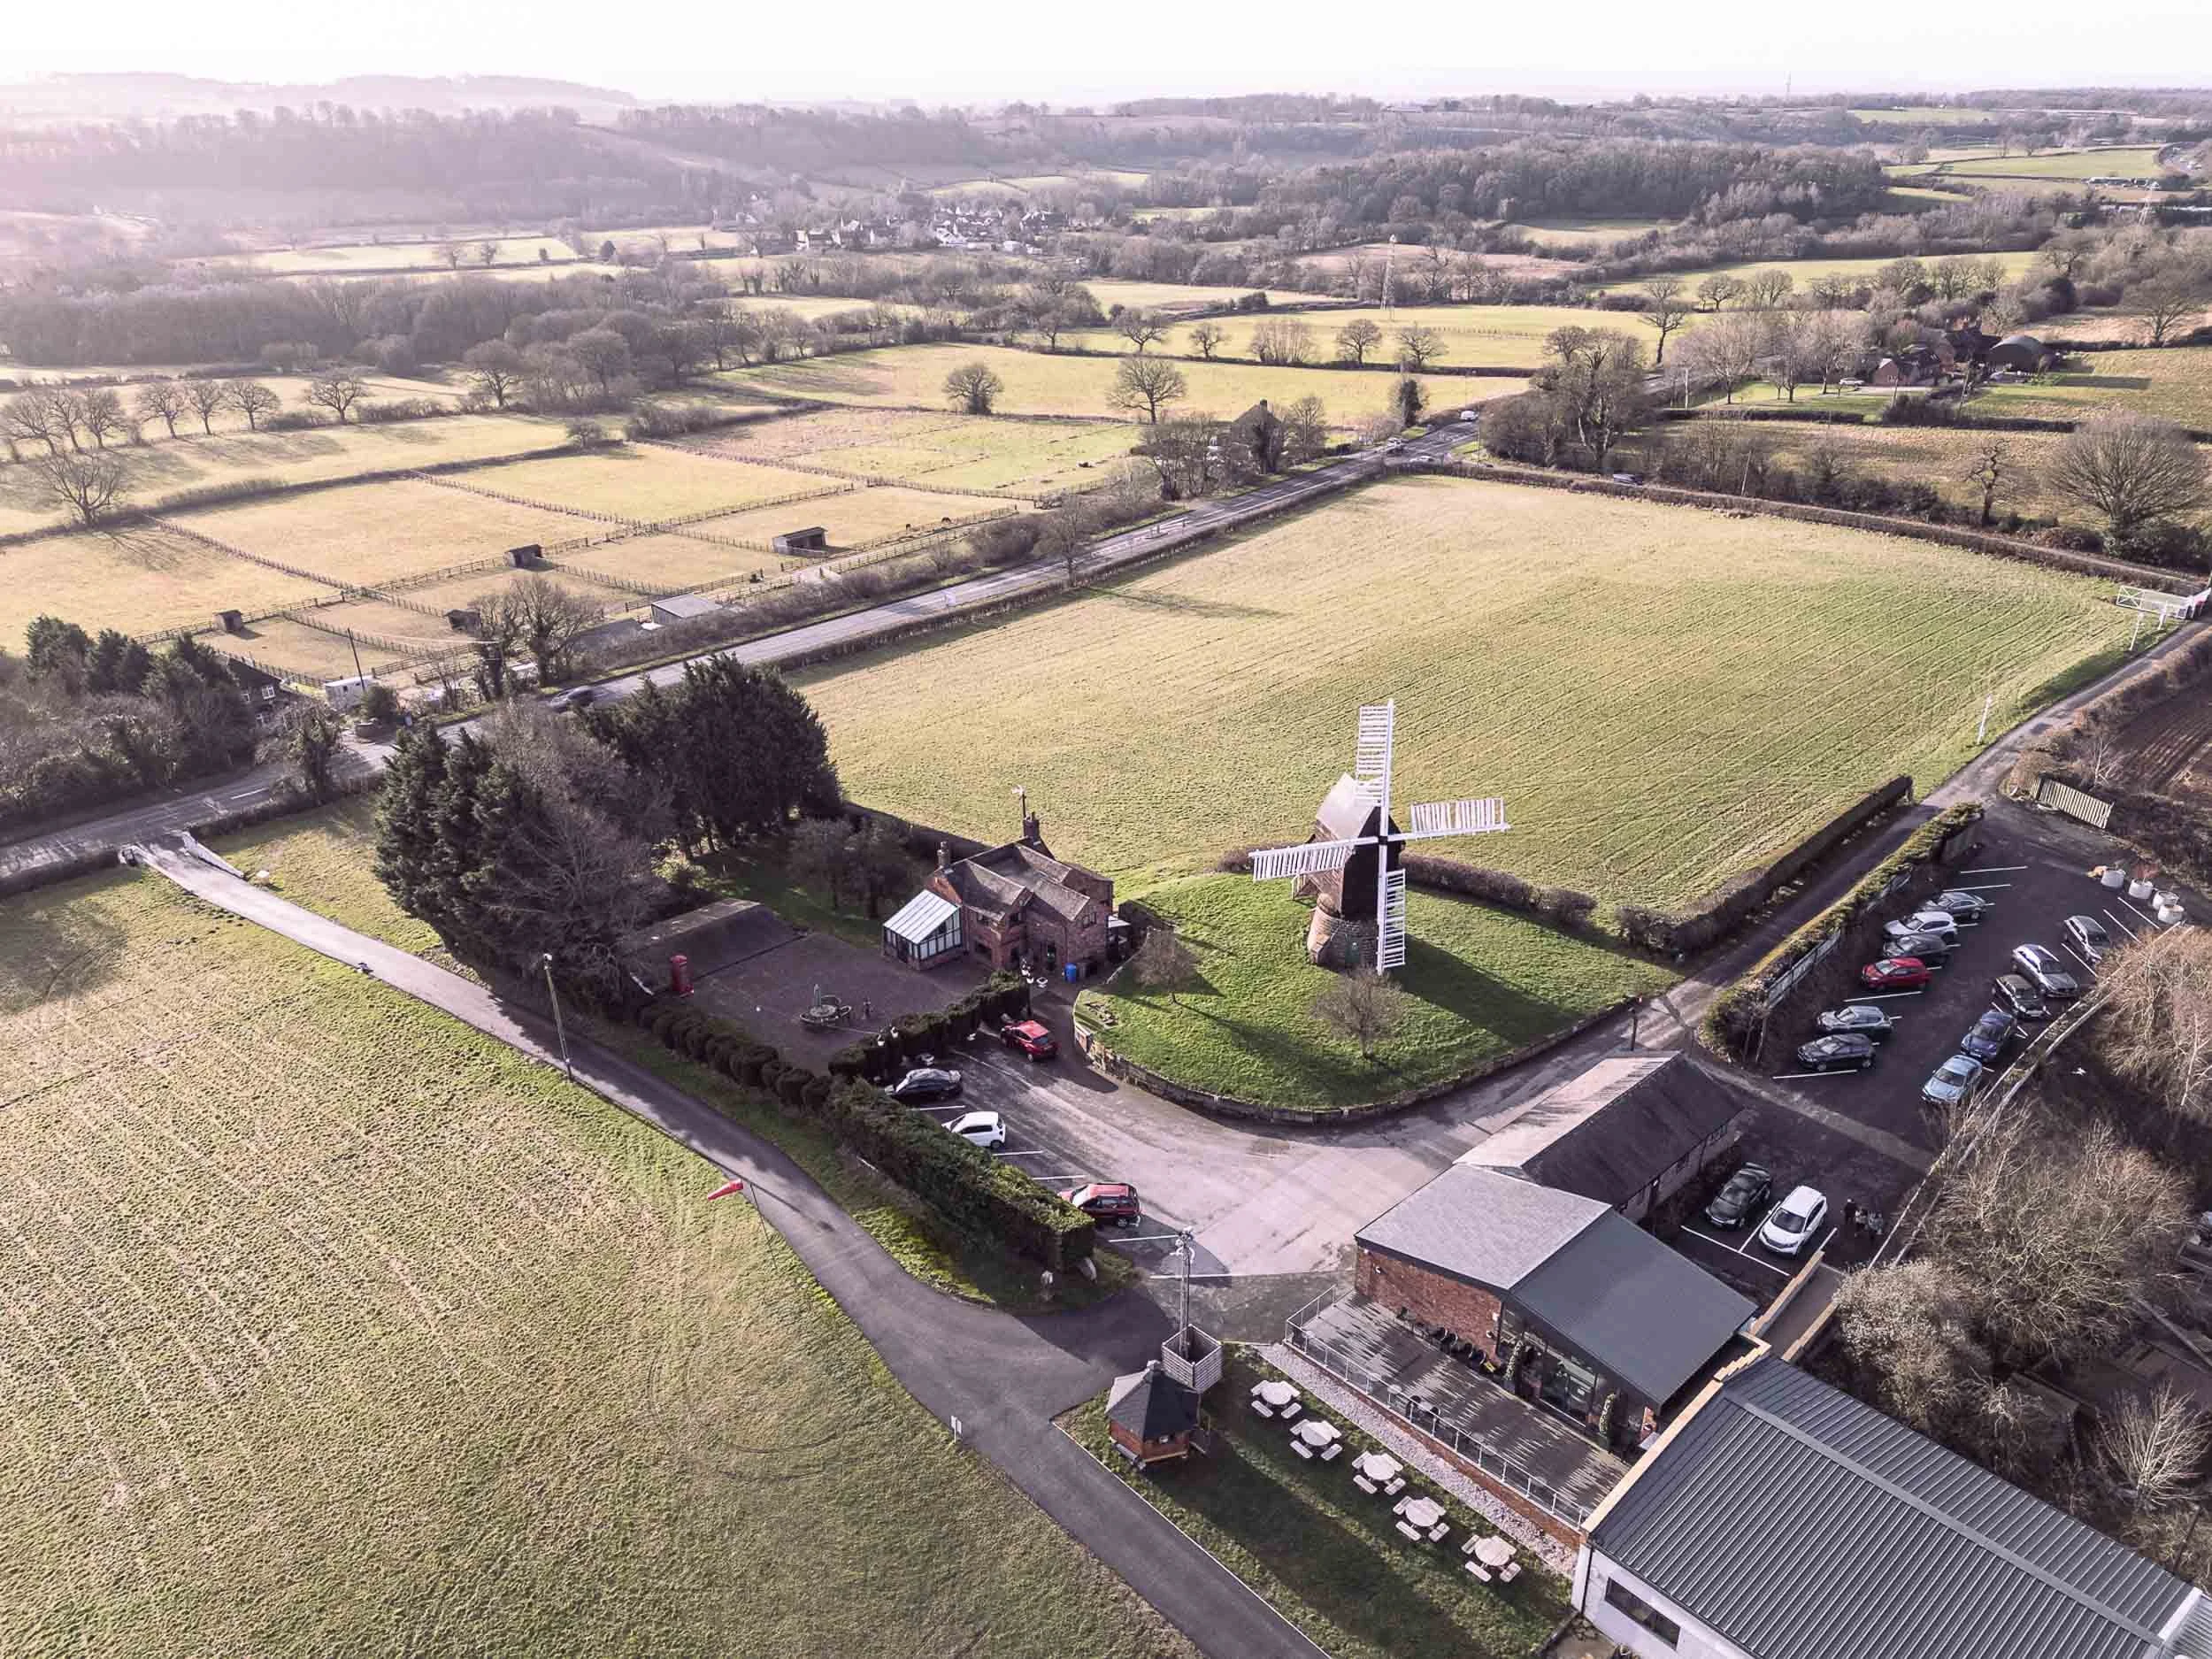
Windmill in a field with the sun behind casting shadows and lighting the surrounding fields
2. Use Gridlines and the Rule of Thirds to Frame Your Subject
Most drones allow you to enable gridlines on the display, which help with composition. The rule of thirds divides your frame into a 3x3 grid and placing key elements at the intersections of these lines results in more balanced and visually appealing images. Instead of placing your subject dead centre, align it with one of these points for a more dynamic composition.
What is composition? Composition refers to how elements are arranged within a photograph. A well-composed image draws the viewer’s eye to the subject in a pleasing and balanced way. The rule of thirds is a fundamental guideline that helps create a strong composition.
3. Utilise the Bracketing Feature for High-Contrast Scenes
Bracketing involves taking multiple shots at different exposure levels. This is especially useful in high-contrast scenarios where highlights might be too bright or shadows too dark. High contrast scenarios are a frequent occurrence when capturing images from the sky and they’re often difficult to control. By using exposure bracketing, you can merge images later in editing to create a well-balanced final shot.
What are exposure levels? Exposure refers to how much light reaches the camera sensor. An underexposed image is too dark, while an overexposed image is too bright. Bracketing ensures that the final merged shot will have the correct exposure and combining them can enhance details in the highlights and shadows.
4. Keep Your ISO Low and Aperture Wide Open
Drones often have fixed apertures, but where adjustable, keeping it wide open allows for more light to hit the sensor. Since drones already have a minimal depth of field, this won’t significantly affect background blur. Keeping your ISO low ensures minimal noise in your images and adjusting your shutter speed accordingly helps maintain proper exposure.
What is ISO? ISO measures the camera sensor’s sensitivity to light. A low ISO (e.g. 100) produces a cleaner image with less noise, while a high ISO (e.g. 3200) can introduce graininess or digital noise.
What is aperture? Aperture controls the amount of light entering the lens. A wider aperture (low f-number) lets in more light, which is useful in low-light conditions. However, many drones have fixed apertures, so this setting may not always be adjustable.
What is shutter speed? Shutter speed determines how long the camera sensor is exposed to light. A fast shutter speed (e.g. 1/1000s) freezes motion, while a slow shutter speed (e.g., 1/30s) captures motion blur. Adjusting shutter speed helps control exposure when ISO and aperture settings are fixed.
5. Shoot in Manual Mode
Manual mode gives you complete control over settings such as ISO, shutter speed and white balance. This prevents the drone’s auto mode from making unnecessary adjustments, allowing you to capture the best possible version of your photograph.
What is white balance? White balance adjusts the colour temperature of your image to ensure accurate colours. Different lighting conditions (e.g. sunlight, cloudy skies, artificial light) affect colour tones. Adjusting white balance manually ensures natural-looking colours in your photos.
6. Take Oblique Angle Shots
Shooting at a 45-degree (or more) oblique angle instead of straight down or straight ahead can create a more dynamic perspective. It also helps avoid lens flare that often occurs when shooting directly into the sky. Oblique angles give depth and context to your photos, making them more visually compelling. Oblique shots are a great option for estate agent photography, showcasing properties from a new angle.
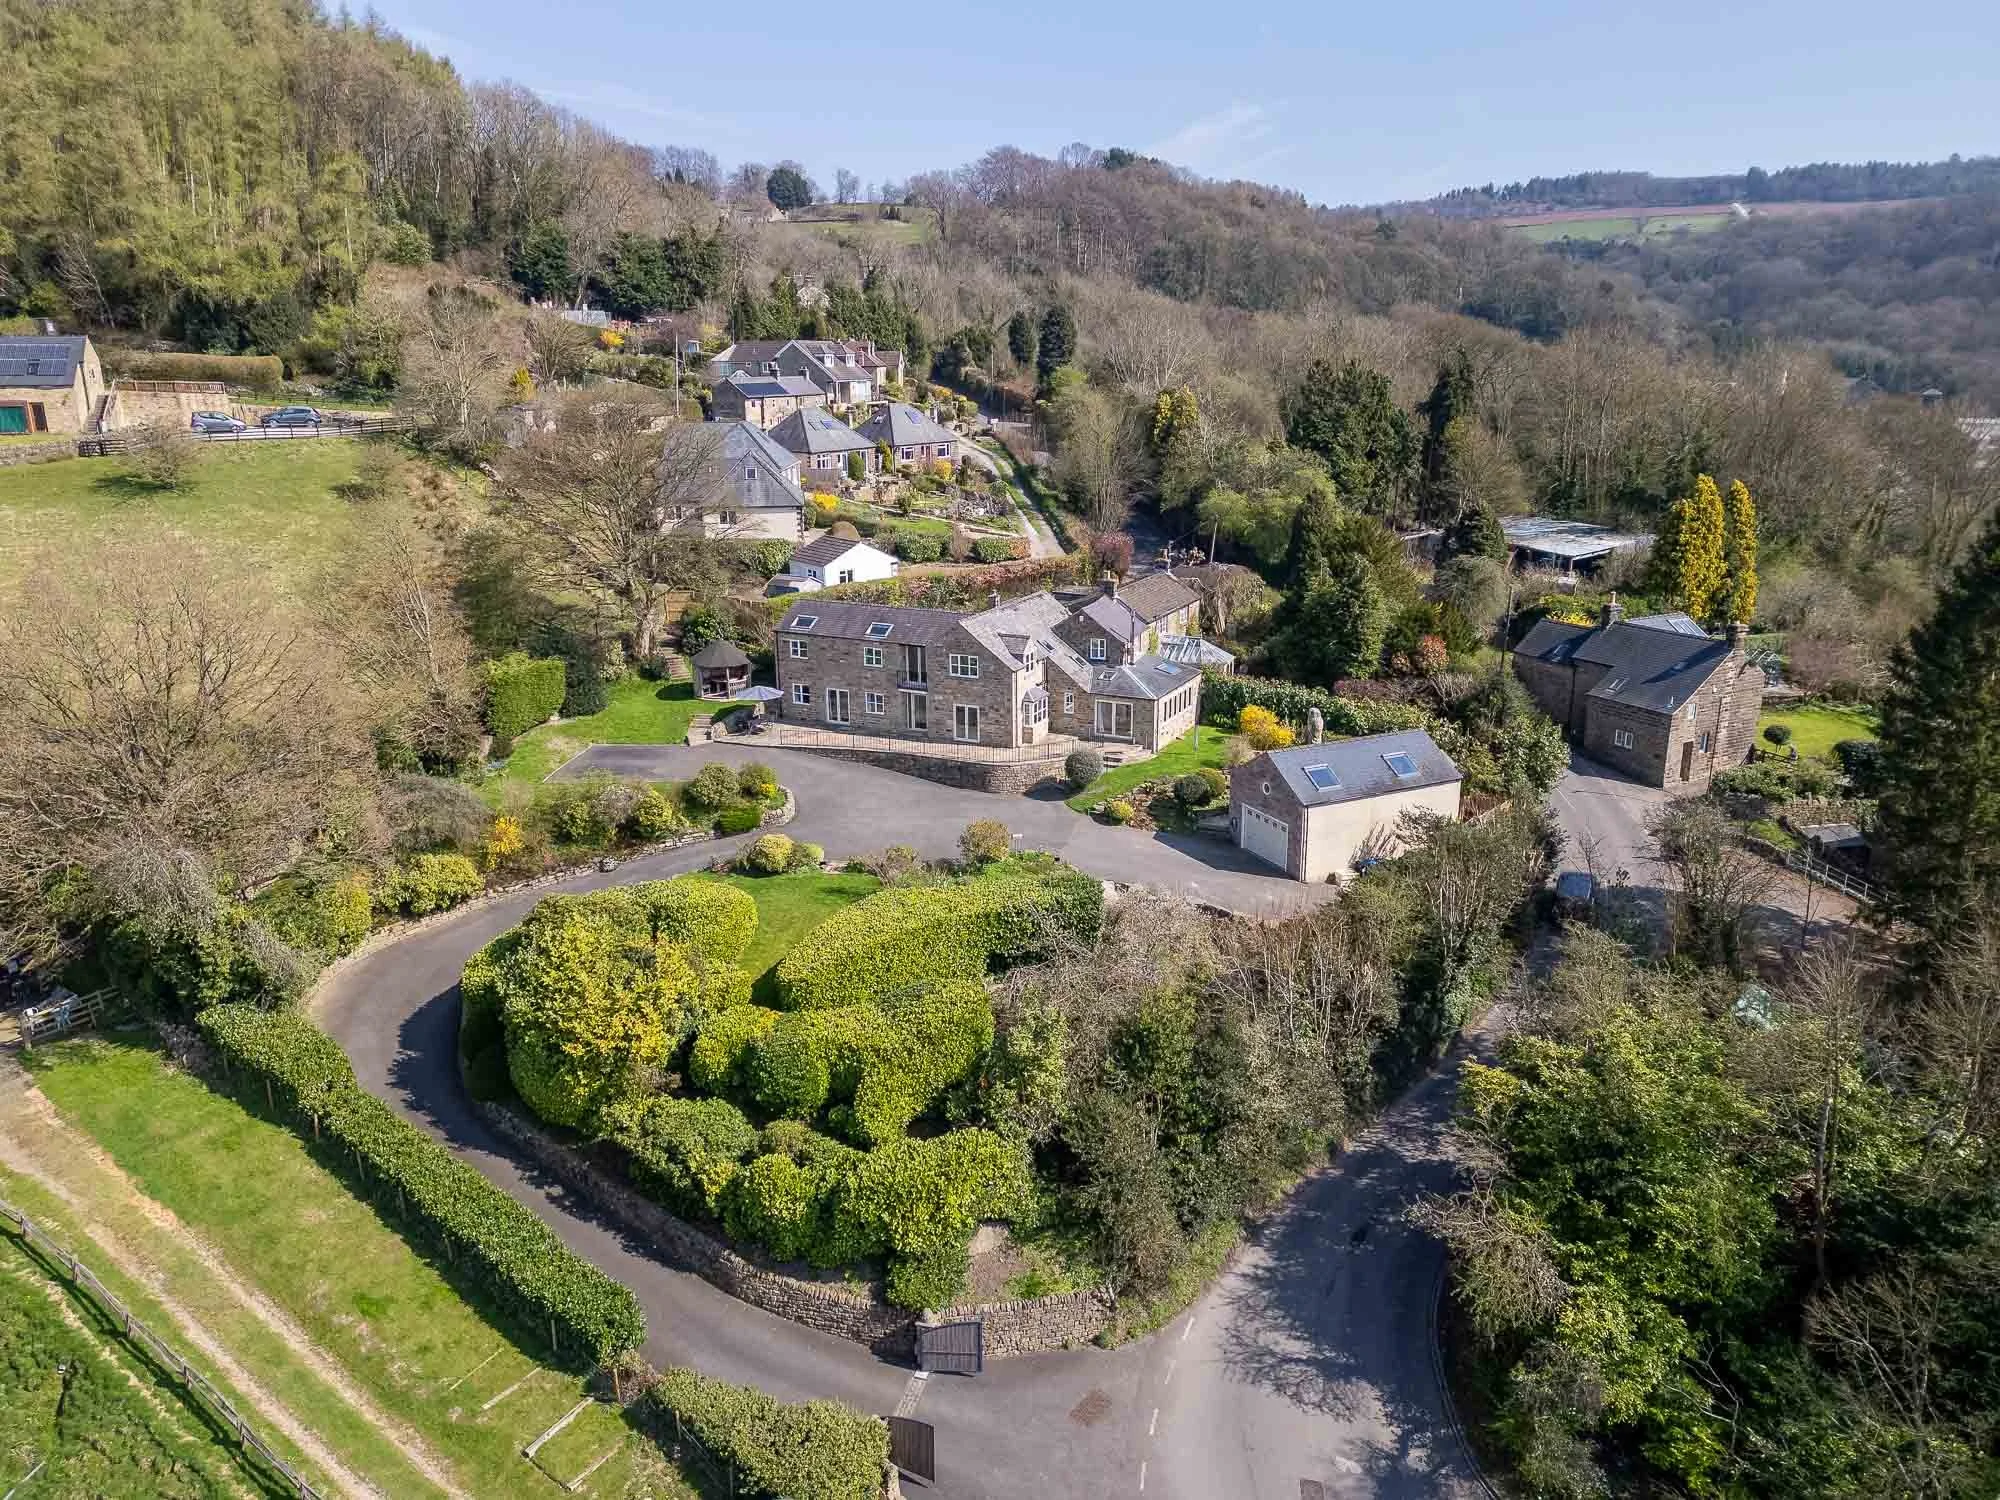
Oblique shot of country house with foreground and background
7. Explore Unique Positions Only a Drone Can Capture
One of the biggest advantages of aerial photography is accessing angles that would otherwise be impossible. While high-altitude shots are impressive, don’t forget about low-altitude photography. Experiment with capturing images under bridges (vital for inspections), close to the surface of a lake, or weaving through dense forests to create unique and engaging compositions.
8. Capture High-Altitude, Top-Down Shots for Stunning Patterns
Shooting directly downward from a high altitude reveals fascinating geometric patterns, textures and abstract compositions. Cities, forests, coastlines and roads can all create interesting visual effects from above.

Top down image of a corporate event
9. Revisit Locations in Different Weather Conditions
The same location can look entirely different depending on the weather. Bright sunshine, after snowfall or stormy clouds can each add a unique mood and atmosphere to your shots. Don’t hesitate to revisit your favourite spots in various conditions to capture a fresh perspective. But always remember to check what the weather will be and how this impacts flying conditions, flying safely is always the number 1 priority.
10. Edit Your Photos for the Best Results
Post-processing is a crucial step in drone photography. Even basic edits like cropping, colour correction, contrast adjustment and sharpening can dramatically improve your images. Software like Adobe Lightroom or free alternatives like Snapseed can help you enhance your shots and bring out their full potential.
Final Thoughts
Drone photography is a fantastic way to explore creative compositions and capture breathtaking perspectives. By mastering manual settings, considering lighting and composition and experimenting with different angles and weather conditions, you’ll be well on your way to capturing stunning aerial shots.